Dazbo's Acme Blogging App on Google Cloud
Acme Blogging App Hosting on Google Cloud Platform

Project Factory
Sections in this Page
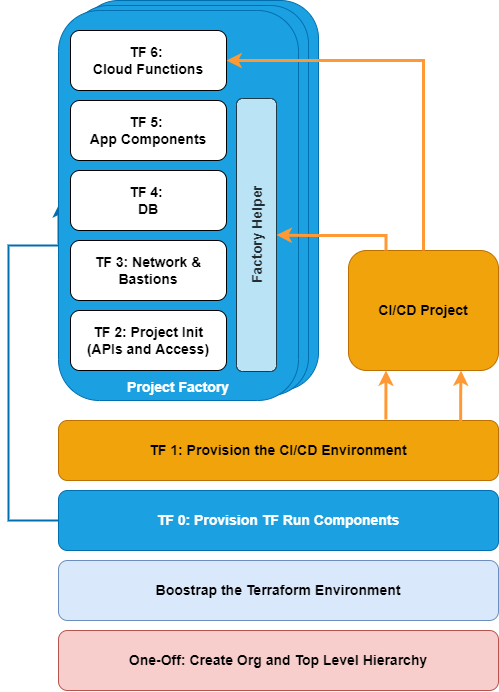
Overall Structure
The project factory builds target environments (e.g. Dev-1, Dev-2, QA, Prod) in a layered manner. This allows potential separation of duties between the Platform Team and the DevOps team who are deploying resources within the project. It also means each layer can be destroyed and rebuilt readily, without impacting other deployed resources.
For example:
- The Platform Team might be responsible for creation of the project, service accounts, VPCs, subnets, and IAP-enabled bastion hosts.
- The individual DevOps team might be responsible for application infrastructure, such as load balancers and Cloud SQL instances.
Configuration / Variables
Variables are typically specified in the terraform.tfvars file. E.g.
| Property | Dev-n | UAT | Prod |
|---|---|---|---|
| Parent Folder ID | 761483431086 | 761483431086 | 893523376402 |
| Env Category | Non-Prod | Non-Prod | Prod |
| DB Deletion Protection | false | false | true |
Run the Project Factory
These steps assume that Steps 0 and 1 (Foundation) have already been completed.
What follows are the detailed steps for performing steps TF 2, TF 3, TF 4, and TF 5, as shown in this diagram:
Step 2 - Project Creation
Here we create a target (e.g. Dev) project, enable APIs, enable secret manager, and allow the Cloud Run service agent to view the shared GCR.
We will create Terraform workspaces for each environment we want to manage. Check the terraform.tfvars file for allowed environments.
cd iac/2-project-factory-init
source ../init_vars.sh
gcloud config set project ${TF_VAR_admin_id}
One-off:
# We need to point to state in the existing bucket:
cat > backend.tf << EOF
terraform {
 backend "gcs" {
   bucket  = "${TF_VAR_admin_id}"
   prefix  = "terraform/project-factory-init/state"
 }
}
EOF
Per-environment (if the environment is new):
terraform init
terraform workspace new dev-1
And then, each time we want to build it:
# switch the desired workspace. E.g.
terraform workspace select dev-1

# Optionally validate
terraform validate

terraform plan -out prj.tfplan
terraform apply "prj.tfplan"

# Get the project info.  You'll need the project ID for the next step. (Not the number!!)
terraform output -raw project_info

# Get the random project suffix
terraform output -raw project_suffix
Step 3 - Network and Bastions
Here we create the VPC and subnets, serverless connector for serverless capabilities (like Cloud Functions), and create bastion hosts with IAP. The bastion has some useful tooling installed, such as the Cloud SQL Auth proxy (but with no credentials), and the MySQL client.
Create terraform spaces that match what was done in step 2.
cd iac/3-project-factory-network
source ../init_vars.sh
gcloud config set project ${TF_VAR_admin_id}
One-off:
# We need to point to state in the existing bucket:
cat > backend.tf << EOF
terraform {
 backend "gcs" {
   bucket  = "${TF_VAR_admin_id}"
   prefix  = "terraform/project-factory-network/state"
 }
}
EOF
Add the project ID to the terraform.tfvars. Remember that for project IDs, we want the project_id, not id or number.
terraform init
terraform workspace new dev-1
And then, each time we want to build it:
# switch the desired workspace. E.g.
terraform workspace select dev-1

# Optionally validate
terraform validate

terraform plan -out prj.tfplan
terraform apply "prj.tfplan"

# Get the VPC ID
terraform output -raw vpc_network_id
Step 4 - App Infra - Database
Here we deploy the highly available Cloud SQL MySQL database. We generate a random password, assign it to the new database, and store it Secret Manager for later use.
cd iac/4-app-infra
source ../init_vars.sh
gcloud config set project ${TF_ADMIN_ID}
One-off:
# We need to point to state in the existing bucket:
cat > backend.tf << EOF
terraform {
 backend "gcs" {
   bucket  = "${TF_VAR_admin_id}"
   prefix  = "terraform/project-factory-app-infra/state"
 }
}
EOF

terraform init

# Create workspaces to match previous. E.g.
terraform workspace new dev-1
And then, each time we want to build it:
Replace appropriate variables in terraform.tfvars using output variables from the previous steps.
Remember that for project IDs, we want the project_id, not id or number.
# check we're in the right workspace. E.g.
terraform workspace select dev-1

# Optionally validate
terraform validate

terraform plan -out out.tfplan
terraform apply "out.tfplan"
Step 5 - App Infra - Frontend
Here we deploy the load balancer with HTTPS proxy, Google-managed SSL certificate, managed instance group, health checks, GCE instances in the MIG, and deploy the application and Cloud SQL proxy to the instance, as containers.
Note that in this implementation, the acme-blogging.just2good.co.uk.co.uk domain has been registered externally to Google, and the domain has been pointed to the load balancer external address using a DNS A record.
In more detail:
- Ubuntu GCE instances are used to host the Ghost application.
- The Ghost application is built from a Dockerfile in the Google Cloud Source Repos, using our Cloud Build CI/CD pipeline. The image is stored in Google Container Repositories (GCR).
- The instance startup script retrieves this image from the GCR.
- The instance also retrieves the Cloud SQL Auth Proxy as a container image, from the GCR.
- The instance startup script installs Docker, and Docker Compose.
- The instance startup script retrieves the service account credentials private key from Secret Manager. This must be passed to the Cloud SQL Auth Proxy container, in order for the proxy to connect to the actual Cloud SQL database.
- Finally, the startup script uses Docker Compose to start both containers.
- The GCE instances is templated, and this template is used to spin up instances in the Managed Instance Group (MIG).
- The MIG is attached to an autoscaler and a global HTTPS load balancer.
cd iac/5-app-infra-frontend
source ../init_vars.sh
gcloud config set project ${TF_VAR_admin_id}
One-off:
# We need to point to state in the existing bucket:
cat > backend.tf << EOF
terraform {
 backend "gcs" {
   bucket  = "${TF_VAR_admin_id}"
   prefix  = "terraform/project-factory-app-infra-frontend/state"
 }
}
EOF

terraform init

# Create workspaces to match previous. E.g.
terraform workspace new dev-1
And then, each time we want to build it:
Replace appropriate variables in terraform.tfvars using output variables from the previous steps.
Remember that for project IDs, we want the project_id, not id or number.
# check we're in the right workspace. E.g.
terraform workspace select dev-1

# Optionally validate
terraform validate

terraform plan -out out.tfplan
terraform apply "out.tfplan"
At this point, if a new environment / a new external load balancer address has been created, you must update any externally hosted domain A records to point to the new address.